Common to most of the boards
Exceptions:
- sama5d2 revision A, only to access the ROMCode through serial interface and see the
RomBOOT message appearing, configure your serial line to 57600.
Change it back to 115200 for normal operation.
All components and demo binaries are now configured to work at 115200 8-N-1.
The usual serial communication parameters are
115200 8-N-1 :
|
|
| Baud rate |
115200 |
| Data |
8 bits |
| Parity |
None |
| Stop |
1 bit |
| Flow control |
None |
|
|
|
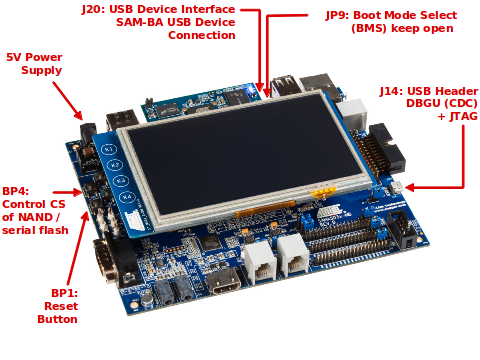
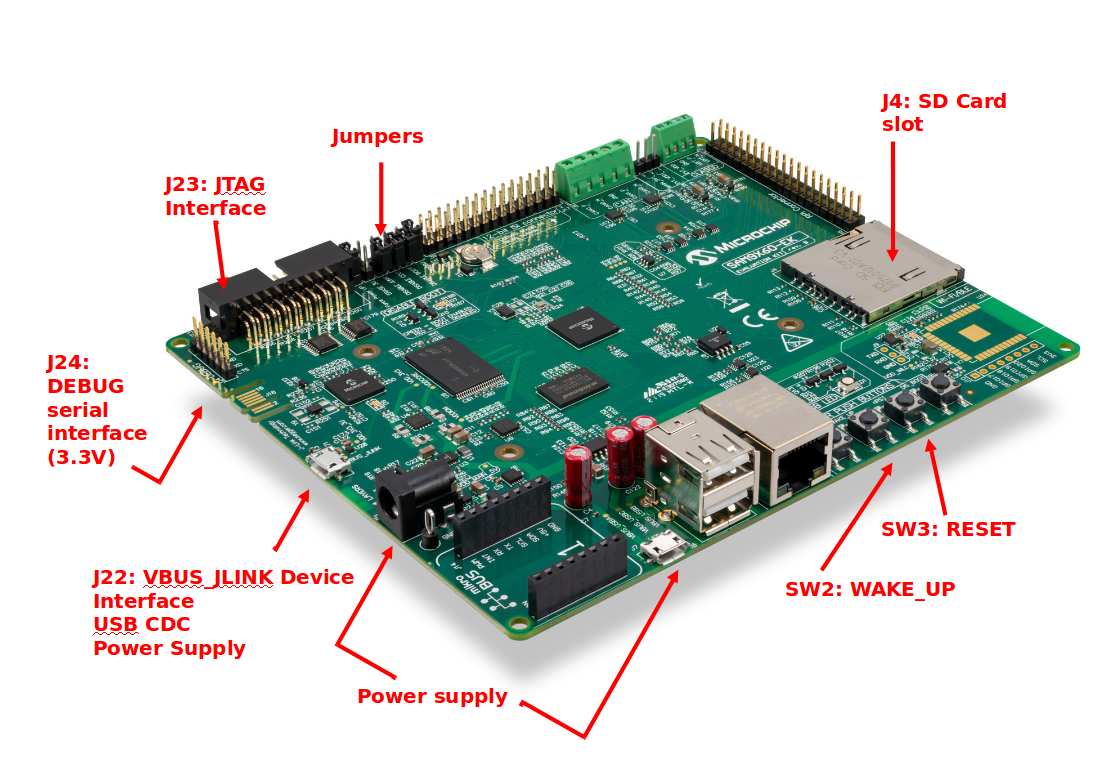
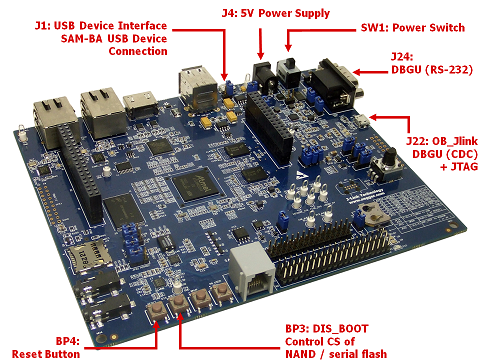
Access the console - sama5d4ek
The DBGU serial console can be accessed from two connectors. One is from the RS-232 connector (marked as DBGU J24), another is from micro-A USB connector that gives access to the on-board serial-USB converter (marked as J22 OB-JLink).
The JP19 and JP20 jumpers are used to select which port is used to access DBGU serial console.
Using RS-232 connector (DBGU J24)
- Open JP21 to enable DBGU
- Choose (1-2) for JP19 and JP20 jumper settings
- Connect a DB9 serial cable to the J24 connector
- Now open your favorite terminal emulator with appropriate settings
Using the micro-A USB connector (J22 OB-JLink)
You can also access the serial console through the on-board serial-USB converter. In fact, the Cortex-M3 chip underneath the Evaluation Kit acts as a serial-to-USB converter and is loaded with a firmware that is able to speak USB-CDC.
- For Microsoft Windows users: Install the J-Link CDC USB driver
 . No need to install a driver on any regular Linux distribution.
- Open JP21 to enable DBGU
- Open JP10 to enable CDC for OB-JLINK
- Choose (2-3) for JP19 and JP20 jumper settings
- Connect the USB cable to the board (J22 OB-JLink)
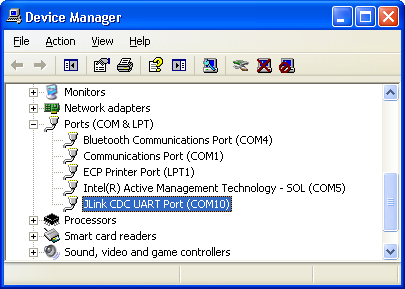
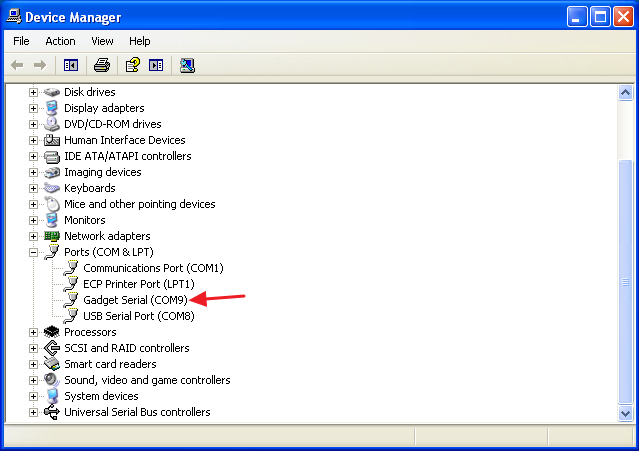
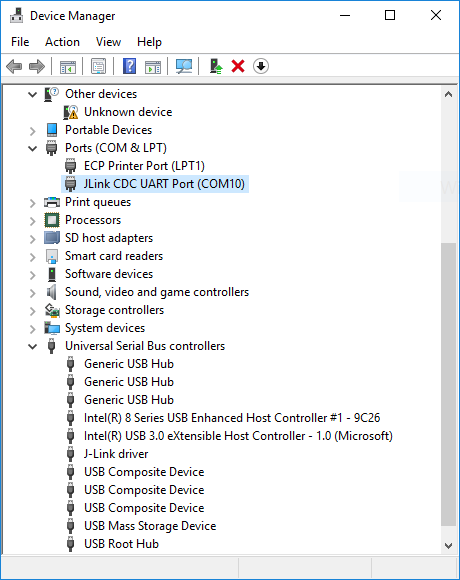
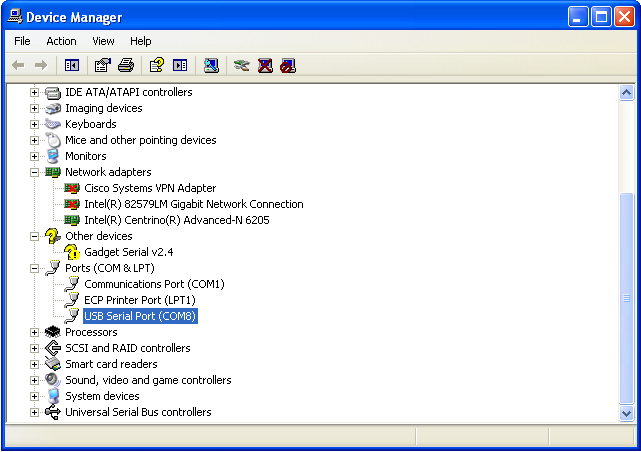
- For Microsoft Windows users: identify the USB connection that is established
JLink CDC UART Port should appear in Device Manager. The COMxx number will be used to configure the terminal emulator.
-
- For Linux users: identify the USB connection by monitoring the last lines of
dmesg command. The /dev/ttyACMx number will be used to configure the terminal emulator.
- Now open your favorite terminal emulator with appropriate settings
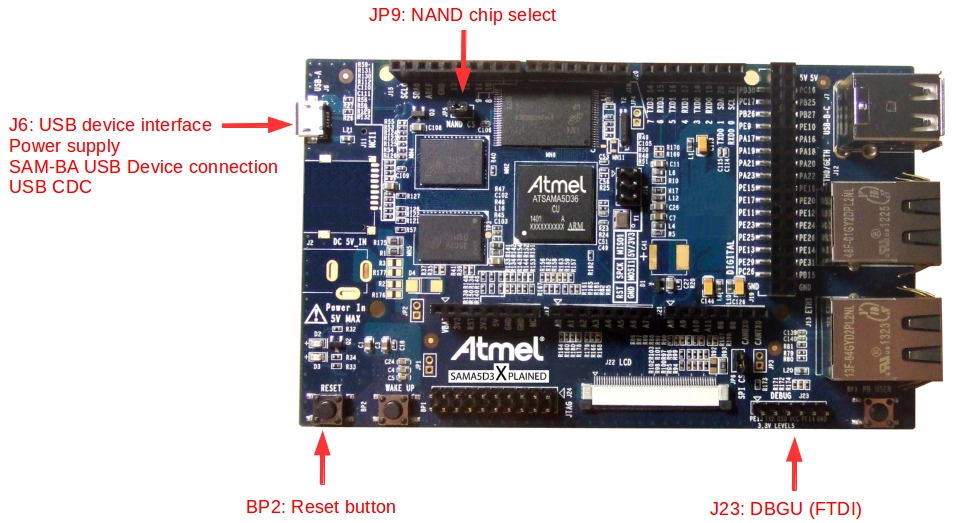
Access the console - sama5d3xek
You can access the serial console through the on-board serial-USB converter. In fact, the Cortex-M3 chip underneath the Evaluation Kit acts as a serial-to-USB converter and is loaded with a firmware that is able to speak USB-CDC.
- For Microsoft Windows users: Install the J-Link CDC USB driver. No need to install a driver on any regular Linux distribution.
- Connect the USB cable to the board (J14 – JTAG and USB Serial DBGU)
- For Microsoft Windows users: identify the USB connection that is established
JLink CDC UART Port should appear in Device Manager. The COMxx number will be used to configure the terminal emulator.
-
- For Linux users: identify the USB connection by monitoring the last lines of
dmesg command. The /dev/ttyACMx number will be used to configure the terminal emulator.
- Now open your favorite terminal emulator with appropriate settings
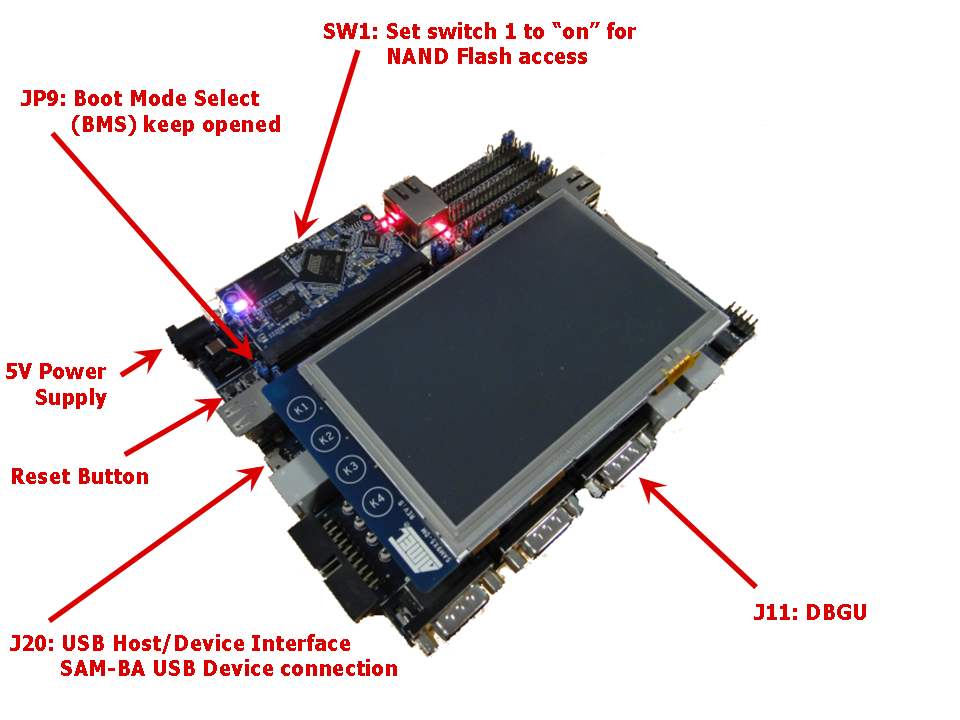
Access the console - at91sam9x5ek
The DBGU serial console can be accessed from the RS-232 connector (marked as DBGU J11).
Using RS-232 connector (DBGU J11)
- Connect a DB9 serial cable to the J11 connector
- Now open your favorite terminal emulator with appropriate settings
-
- For Linux users: identify the USB connection by monitoring the last lines of
dmesg command. The /dev/ttyUSBx or /dev/ttyACMx number will be used to configure the terminal emulator.
[605576.562740] usb 1-1.1.2: new full-speed USB device number 17 using ehci-pci
[605576.660920] usb 1-1.1.2: New USB device found, idVendor=0403, idProduct=6001
[605576.660933] usb 1-1.1.2: New USB device strings: Mfr=1, Product=2, SerialNumber=3
[605576.660939] usb 1-1.1.2: Product: TTL232R-3V3
[605576.660944] usb 1-1.1.2: Manufacturer: FTDI
[605576.660958] usb 1-1.1.2: SerialNumber: FTGNVZ04
[605576.663092] ftdi_sio 1-1.1.2:1.0: FTDI USB Serial Device converter detected
[605576.663120] usb 1-1.1.2: Detected FT232RL
[605576.663122] usb 1-1.1.2: Number of endpoints 2
[605576.663124] usb 1-1.1.2: Endpoint 1 MaxPacketSize 64
[605576.663126] usb 1-1.1.2: Endpoint 2 MaxPacketSize 64
[605576.663128] usb 1-1.1.2: Setting MaxPacketSize 64
[605576.663483] usb 1-1.1.2: FTDI USB Serial Device converter now attached to ttyUSB0
A /dev/ttyUSB0 node has been created.
- Now open your favorite terminal emulator with appropriate settings
Access the console - sama5d4_xplained
The DBGU serial console can be accessed from two connectors. One is from the DBGU port with the help of a TTL-to-USB serial cable (marked as DEBUG J1), another is from micro-A USB connector that gives access to the
on-board serial-to-USB converter (marked as J20 EDBG-USB).
Using DBGU on TTL-to-USB connector (DEBUG J1)
- For Microsoft Windows users: Install the driver of your USB TTL serial cable. FTDI-based ones are the most popular, have a look to this page to get the driver: http://www.ftdichip.com/Drivers/VCP.htm
- Be sure to connect a 3.3V compatible cable and identify its GND pin. Place it properly according to the silkscreen and connect the cable to the board (J1)
- For Microsoft Windows users: Identify the USB connection that is established,
USB Serial Port should appear in Device Manager. The COMxx number will be used to configure the terminal emulator.

-
- For Linux users: Identify the serial USB connection by monitoring the last lines of
dmesg command. The /dev/ttyUSBx number will be used to configure the terminal emulator.
[605576.562740] usb 1-1.1.2: new full-speed USB device number 17 using ehci-pci
[605576.660920] usb 1-1.1.2: New USB device found, idVendor=0403, idProduct=6001
[605576.660933] usb 1-1.1.2: New USB device strings: Mfr=1, Product=2, SerialNumber=3
[605576.660939] usb 1-1.1.2: Product: TTL232R-3V3
[605576.660944] usb 1-1.1.2: Manufacturer: FTDI
[605576.660958] usb 1-1.1.2: SerialNumber: FTGNVZ04
[605576.663092] ftdi_sio 1-1.1.2:1.0: FTDI USB Serial Device converter detected
[605576.663120] usb 1-1.1.2: Detected FT232RL
[605576.663122] usb 1-1.1.2: Number of endpoints 2
[605576.663124] usb 1-1.1.2: Endpoint 1 MaxPacketSize 64
[605576.663126] usb 1-1.1.2: Endpoint 2 MaxPacketSize 64
[605576.663128] usb 1-1.1.2: Setting MaxPacketSize 64
[605576.663483] usb 1-1.1.2: FTDI USB Serial Device converter now attached to ttyUSB0
A
/dev/ttyUSB0 node has been created.
- Now open your favorite terminal emulator with appropriate settings
Using the micro-A USB connector (J20 EDBG-USB)
You can also access the serial console through the
on-board serial-to-USB converter. In fact, the Atmel EDBG (Embedded Debugger) chip on the Evaluation Kit acts as a serial-to-USB converter and is loaded with a firmware that is able to talk USB-CDC protocol.
- For Microsoft Windows users: Install USB drivers for Atmel and Segger tools. No need to install a driver on any regular Linux distribution.
- Open JP1 to enable EDBG
- Connect the USB cable to the board (J20 EDBG-USB)
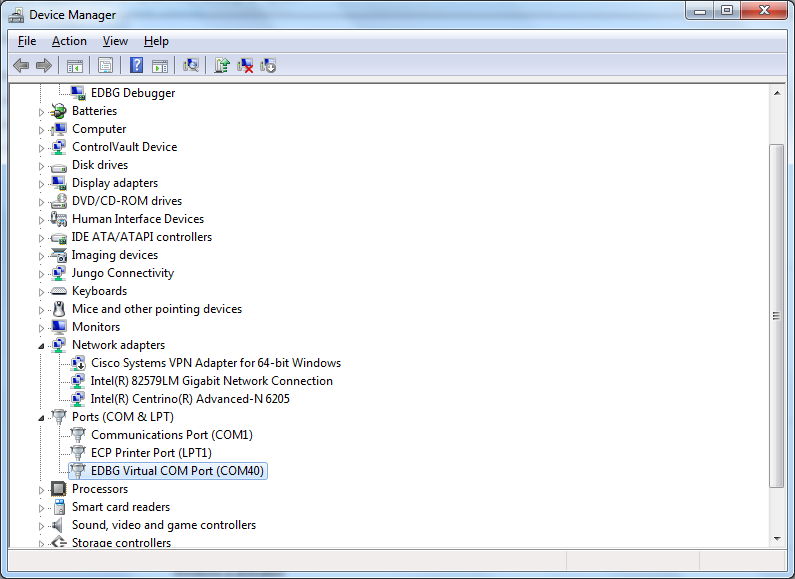
- For Microsoft Windows users: identify the USB connection that is established
EDBG Virtual COM Port should appear in Device Manager. The COMxx number will be used to configure the terminal emulator.
-
- For Linux users: identify the USB connection by monitoring the last lines of
dmesg command. The /dev/ttyACMx number will be used to configure the terminal emulator.
[172677.700868] usb 2-1.4.4: new full-speed USB device number 31 using ehci-pci
[172677.792677] usb 2-1.4.4: not running at top speed; connect to a high speed hub
[172677.793418] usb 2-1.4.4: New USB device found, idVendor=03eb, idProduct=6124
[172677.793424] usb 2-1.4.4: New USB device strings: Mfr=0, Product=0, SerialNumber=0
[172677.793897] cdc_acm 2-1.4.4:1.0: This device cannot do calls on its own. It is not a modem.
[172677.793924] cdc_acm 2-1.4.4:1.0: ttyACM0: USB ACM device
idVendor=03eb, idProduct=6124: from this message you can see it's Microchip board USB connection.
- Now open your favorite terminal emulator with appropriate settings
Access the console - sama5d3_xplained
You can access the serial console through two ways:
- the DBGU port with the help of a USB TTL serial cable,
- the USB CDC device once Linux has started.
DBGU port
- For Microsoft Windows users: Install the driver of your USB TTL serial cable. FTDI-based ones are the most popular, have a look to this page to get the driver: http://www.ftdichip.com/Drivers/VCP.htm
- Connect the cable to the board (J23)
- For Microsoft Windows users: Identify the USB connection that is established,
USB Serial Port should appear in Device Manager. The COMxx number will be used to configure the terminal emulator.
- For Linux users: Identify the serial USB connection by monitoring the last lines of
dmesg command. The /dev/ttyUSBx number will be used to configure the terminal emulator.
[605576.562740] usb 1-1.1.2: new full-speed USB device number 17 using ehci-pci
[605576.660920] usb 1-1.1.2: New USB device found, idVendor=0403, idProduct=6001
[605576.660933] usb 1-1.1.2: New USB device strings: Mfr=1, Product=2, SerialNumber=3
[605576.660939] usb 1-1.1.2: Product: TTL232R-3V3
[605576.660944] usb 1-1.1.2: Manufacturer: FTDI
[605576.660958] usb 1-1.1.2: SerialNumber: FTGNVZ04
[605576.663092] ftdi_sio 1-1.1.2:1.0: FTDI USB Serial Device converter detected
[605576.663120] usb 1-1.1.2: Detected FT232RL
[605576.663122] usb 1-1.1.2: Number of endpoints 2
[605576.663124] usb 1-1.1.2: Endpoint 1 MaxPacketSize 64
[605576.663126] usb 1-1.1.2: Endpoint 2 MaxPacketSize 64
[605576.663128] usb 1-1.1.2: Setting MaxPacketSize 64
[605576.663483] usb 1-1.1.2: FTDI USB Serial Device converter now attached to ttyUSB0
A
/dev/ttyUSB0 node has been created.
- Now open your favorite terminal emulator with appropriate settings
USB device port
Once Linux started, the serial USB gadget module is probed. Then you can get a serial console through the USB device interface.
- For Windows users: You may have to install a driver for the USB-CDC device that corresponds to the SAMA5D3 Xplained board. The official .inf file needed to configure the USB-CDC driver: https://www.kernel.org/doc/Documentation/usb/linux-cdc-acm.inf
- For Windows users: Identify the USB connection that is established,
Gadget Serial should appear in Device Manager. The COMxx number will be used to configure the terminal emulator.
- For Linux users: Identify the USB connection by monitoring the last lines of
dmesg command. The /dev/ttyACMx number will be used to configure the terminal emulator.
[609470.350006] usb 2-1.2: new high-speed USB device number 17 using ehci-pci
[609470.443102] usb 2-1.2: New USB device found, idVendor=0525, idProduct=a4a7
[609470.443107] usb 2-1.2: New USB device strings: Mfr=1, Product=2, SerialNumber=0
[609470.443111] usb 2-1.2: Product: Gadget Serial v2.4
[609470.443113] usb 2-1.2: Manufacturer: Linux 3.10.0-yocto-standard with atmel_usba_udc
[609470.450258] cdc_acm 2-1.2:2.0: This device cannot do calls on its own. It is not a modem.
[609470.450314] cdc_acm 2-1.2:2.0: ttyACM0: USB ACM device
- Now open your favorite terminal emulator with appropriate settings
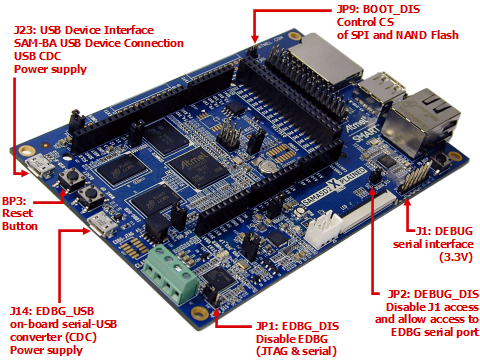
Access the console - sama5d2_xplained
The serial console can be accessed from two connectors. One is from the DEBUG port with the help of a TTL-to-USB serial cable (marked as DEBUG J1), another is from micro-A USB connector that gives access to the
on-board serial-to-USB converter (marked as J14 EDBG-USB).
Using DEBUG on TTL-to-USB connector (DEBUG J1)
- For Microsoft Windows users: Install the driver of your USB TTL serial cable. FTDI-based ones are the most popular, have a look to this page to get the driver: http://www.ftdichip.com/Drivers/VCP.htm
- Open JP2 to enable this DEBUG interface
- Be sure to connect a 3.3V compatible cable and identify its GND pin. Place it properly according to the silkscreen and connect the cable to the board (J1)
- For Microsoft Windows users: Identify the USB connection that is established,
USB Serial Port should appear in Device Manager. The COMxx number will be used to configure the terminal emulator.
- For Linux users: Identify the serial USB connection by monitoring the last lines of
dmesg command. The /dev/ttyUSBx number will be used to configure the terminal emulator.
[605576.562740] usb 1-1.1.2: new full-speed USB device number 17 using ehci-pci
[605576.660920] usb 1-1.1.2: New USB device found, idVendor=0403, idProduct=6001
[605576.660933] usb 1-1.1.2: New USB device strings: Mfr=1, Product=2, SerialNumber=3
[605576.660939] usb 1-1.1.2: Product: TTL232R-3V3
[605576.660944] usb 1-1.1.2: Manufacturer: FTDI
[605576.660958] usb 1-1.1.2: SerialNumber: FTGNVZ04
[605576.663092] ftdi_sio 1-1.1.2:1.0: FTDI USB Serial Device converter detected
[605576.663120] usb 1-1.1.2: Detected FT232RL
[605576.663122] usb 1-1.1.2: Number of endpoints 2
[605576.663124] usb 1-1.1.2: Endpoint 1 MaxPacketSize 64
[605576.663126] usb 1-1.1.2: Endpoint 2 MaxPacketSize 64
[605576.663128] usb 1-1.1.2: Setting MaxPacketSize 64
[605576.663483] usb 1-1.1.2: FTDI USB Serial Device converter now attached to ttyUSB0
A /dev/ttyUSB0 node has been created.
- Now open your favorite terminal emulator with appropriate settings
Using the micro-A USB connector (J14 EDBG-USB)
You can also access the serial console through the
on-board serial-to-USB converter. In fact, the Atmel EDBG (Embedded Debugger) chip on the Evaluation Kit acts as a serial-to-USB converter and is loaded with a firmware that is able to talk USB-CDC protocol.
- For Microsoft Windows users: Install USB drivers for Atmel and Segger tools. No need to install a driver on any regular Linux distribution.
- Open JP1 to enable EDBG
- Close JP2 to disable de DEBUG port J1 (needed to avoid conflict on the UART TX line)
- Connect the USB cable to the board (J14 EDBG-USB)
- For Microsoft Windows users: identify the USB connection that is established
EDBG Virtual COM Port should appear in Device Manager. The COMxx number will be used to configure the terminal emulator.
- For Linux users: identify the USB connection by monitoring the last lines of
dmesg command. The /dev/ttyACMx number will be used to configure the terminal emulator:
usb 1-1.1.1: new high-speed USB device number 20 using ehci-pci
usb 1-1.1.1: New USB device found, idVendor=03eb, idProduct=2111
usb 1-1.1.1: New USB device strings: Mfr=1, Product=2, SerialNumber=3
usb 1-1.1.1: Product: EDBG CMSIS-DAP
usb 1-1.1.1: Manufacturer: Atmel Corp.
usb 1-1.1.1: SerialNumber: ATML0000001989463039
hid-generic 0003:03EB:2111.0007: hiddev0,hidraw3: USB HID v1.11 Device [Atmel Corp. EDBG CMSIS-DAP] on usb-0000:00:1a.0-1.1.1/input0
cdc_acm 1-1.1.1:1.1: ttyACM0: USB ACM device
- Now open your favorite terminal emulator with appropriate settings
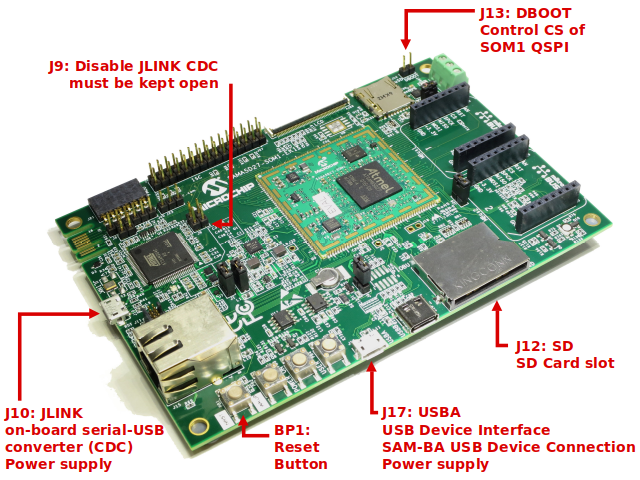
Access the console - sama5d27_som1_ek
The serial console can be accessed from the micro-A USB connector that gives access to the
on-board serial-to-USB converter (marked as J10 JLINK). In fact, the ATSAM3U chip on the Evaluation Kit acts as a serial-to-USB converter and is loaded with a firmware that is able to talk USB-CDC protocol.
- For Microsoft Windows users: Install the J-Link CDC USB driver. No need to install a driver on any regular Linux distribution.
- Connect the USB cable to the board (J10 JLINK)
- For Microsoft Windows users: identify the USB connection that is established
JLINK CDC UART Port should appear in Device Manager. The COMxx number will be used to configure the terminal emulator.

- For Linux users: identify the USB connection by monitoring the last lines of
dmesg command. The /dev/ttyACMx number will be used to configure the terminal emulator:
usb 1-1.2.2.4: new high-speed USB device number 33 using ehci-pci
usb 1-1.2.2.4: config 1 interface 1 altsetting 0 bulk endpoint 0x83 has invalid maxpacket 64
usb 1-1.2.2.4: config 1 interface 1 altsetting 0 bulk endpoint 0x4 has invalid maxpacket 64
usb 1-1.2.2.4: New USB device found, idVendor=1366, idProduct=0105
usb 1-1.2.2.4: New USB device strings: Mfr=1, Product=2, SerialNumber=3
usb 1-1.2.2.4: Product: J-Link
usb 1-1.2.2.4: Manufacturer: SEGGER
usb 1-1.2.2.4: SerialNumber: 000483029109
cdc_acm 1-1.2.2.4:1.0: ttyACM0: USB ACM device
- Now open your favorite terminal emulator with appropriate settings
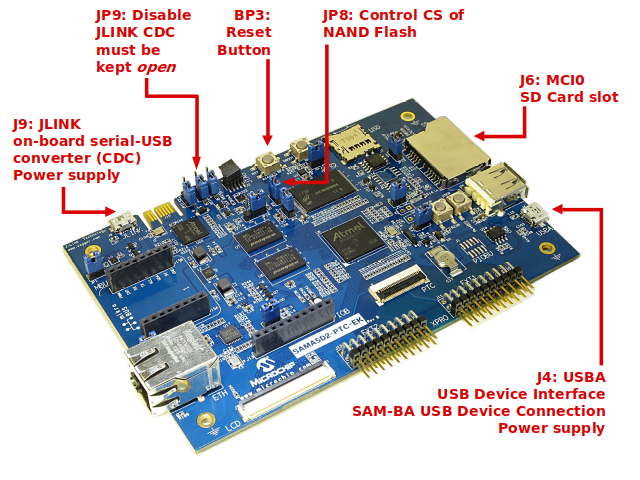
Access the console - sama5d2_ptc_ek
The serial console can be accessed from the micro-A USB connector that gives access to the
on-board serial-to-USB converter (marked as J9 JLINK). In fact, the ATSAM3U chip on the Evaluation Kit acts as a serial-to-USB converter and is loaded with a firmware that is able to talk USB-CDC protocol.
- For Microsoft Windows users: Install the J-Link CDC USB driver. No need to install a driver on any regular Linux distribution.
- Connect the USB cable to the board (J9 JLINK)
- For Microsoft Windows users: identify the USB connection that is established
JLINK CDC UART Port should appear in Device Manager. The COMxx number will be used to configure the terminal emulator.
- For Linux users: identify the USB connection by monitoring the last lines of
dmesg command. The /dev/ttyACMx number will be used to configure the terminal emulator:
usb 1-1.2.2.4: new high-speed USB device number 33 using ehci-pci
usb 1-1.2.2.4: config 1 interface 1 altsetting 0 bulk endpoint 0x83 has invalid maxpacket 64
usb 1-1.2.2.4: config 1 interface 1 altsetting 0 bulk endpoint 0x4 has invalid maxpacket 64
usb 1-1.2.2.4: New USB device found, idVendor=1366, idProduct=0105
usb 1-1.2.2.4: New USB device strings: Mfr=1, Product=2, SerialNumber=3
usb 1-1.2.2.4: Product: J-Link
usb 1-1.2.2.4: Manufacturer: SEGGER
usb 1-1.2.2.4: SerialNumber: 000483029109
cdc_acm 1-1.2.2.4:1.0: ttyACM0: USB ACM device
- Now open your favorite terminal emulator with appropriate settings
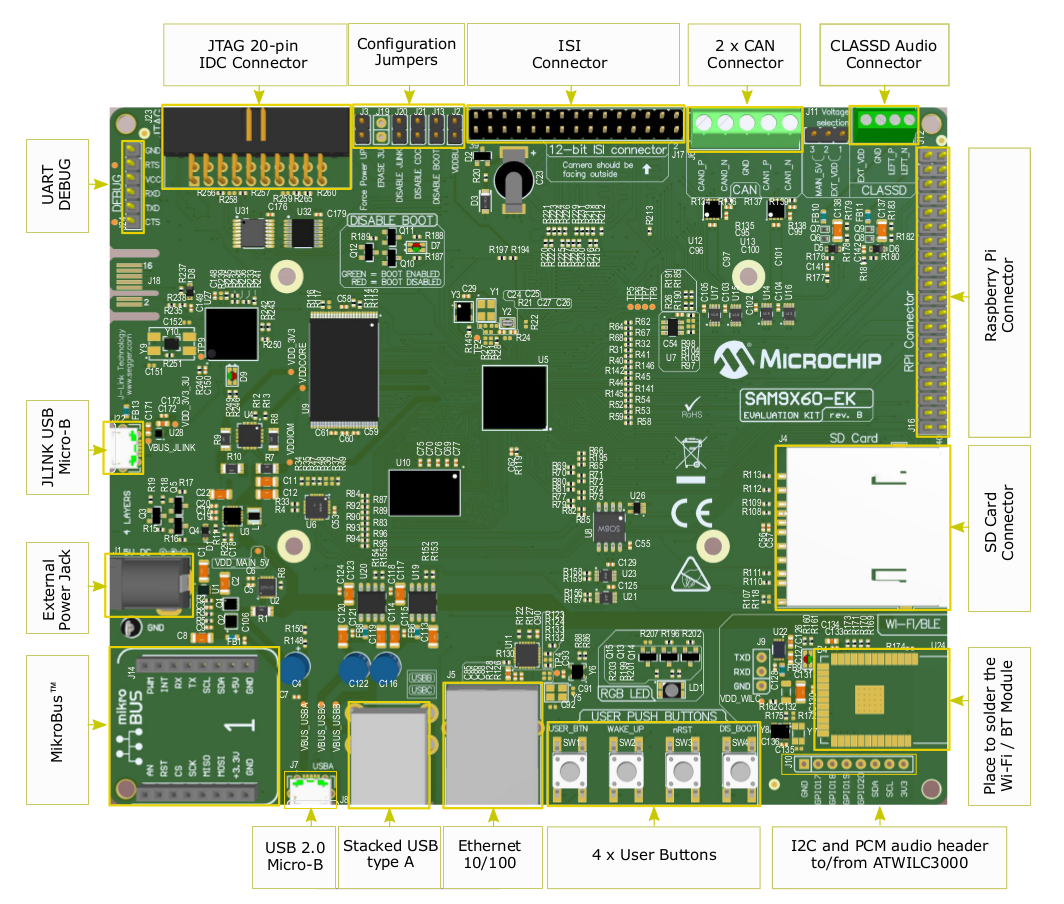
Access the console - sam9x60ek
The SAM9X60-EK documents can be found on microchip website, as following:
Kit Overview
Kit User Guide
How to manually solder the WILC3000 device on the board (AppNote)
The serial console can be accessed from two connectors. One is from the DEBUG port with the help of a TTL-to-USB serial cable (marked as DEBUG J24), another is from micro-A USB connector that gives access to the
on-board serial-to-USB converter (marked as J22 VBUS_JLINK).
Using DEBUG on TTL-to-USB connector (DEBUG J24)
- For Microsoft Windows users: Install the driver of your USB TTL serial cable. FTDI-based ones are the most popular, have a look to this page to get the driver: http://www.ftdichip.com/Drivers/VCP.htm
- Be sure to connect a 3.3V compatible cable and identify its GND pin. Place it properly according to the silkscreen and connect the cable to the board (J24)
- For Microsoft Windows users: Identify the USB connection that is established,
USB Serial Port should appear in Device Manager. The COMxx number will be used to configure the terminal emulator.
- For Linux users: Identify the serial USB connection by monitoring the last lines of
dmesg command. The /dev/ttyUSBx number will be used to configure the terminal emulator.
[605576.562740] usb 1-1.1.2: new full-speed USB device number 17 using ehci-pci
[605576.660920] usb 1-1.1.2: New USB device found, idVendor=0403, idProduct=6001
[605576.660933] usb 1-1.1.2: New USB device strings: Mfr=1, Product=2, SerialNumber=3
[605576.660939] usb 1-1.1.2: Product: TTL232R-3V3
[605576.660944] usb 1-1.1.2: Manufacturer: FTDI
[605576.660958] usb 1-1.1.2: SerialNumber: FTGNVZ04
[605576.663092] ftdi_sio 1-1.1.2:1.0: FTDI USB Serial Device converter detected
[605576.663120] usb 1-1.1.2: Detected FT232RL
[605576.663122] usb 1-1.1.2: Number of endpoints 2
[605576.663124] usb 1-1.1.2: Endpoint 1 MaxPacketSize 64
[605576.663126] usb 1-1.1.2: Endpoint 2 MaxPacketSize 64
[605576.663128] usb 1-1.1.2: Setting MaxPacketSize 64
[605576.663483] usb 1-1.1.2: FTDI USB Serial Device converter now attached to ttyUSB0
A /dev/ttyUSB0 node has been created.
- Now open your favorite terminal emulator with appropriate settings
Using the micro-B USB connector (J22 VBUS_JLINK)
You can also access the serial console through the
on-board serial-to-USB converter. In fact, the Segger J-LINK (Embedded Debugger) chip on the Evaluation Kit acts as a serial-to-USB converter and is loaded with a firmware that is able to talk USB-CDC protocol.
- For Microsoft Windows users: Install USB drivers for Atmel and Segger tools. No need to install a driver on any regular Linux distribution.
- Open JP21 to enable CDC serial connection
- If you need to enable J-Link connection (to program the board with J-Link Embedded Debugger), open JP20
- Connect the USB cable to the board (J22 VBUS_JLINK)
- For Microsoft Windows users: identify the USB connection that is established
EDBG Virtual COM Port should appear in Device Manager. The COMxx number will be used to configure the terminal emulator.
- For Linux users: identify the USB connection by monitoring the last lines of
dmesg command. The /dev/ttyACMx number will be used to configure the terminal emulator:
usb 1-1.1.1: new high-speed USB device number 20 using ehci-pci
usb 1-1.1.1: New USB device found, idVendor=03eb, idProduct=2111
usb 1-1.1.1: New USB device strings: Mfr=1, Product=2, SerialNumber=3
usb 1-1.1.1: Product: EDBG CMSIS-DAP
usb 1-1.1.1: Manufacturer: Atmel Corp.
usb 1-1.1.1: SerialNumber: ATML0000001989463039
hid-generic 0003:03EB:2111.0007: hiddev0,hidraw3: USB HID v1.11 Device [Atmel Corp. EDBG CMSIS-DAP] on usb-0000:00:1a.0-1.1.1/input0
cdc_acm 1-1.1.1:1.1: ttyACM0: USB ACM device
- Now open your favorite terminal emulator with appropriate settings
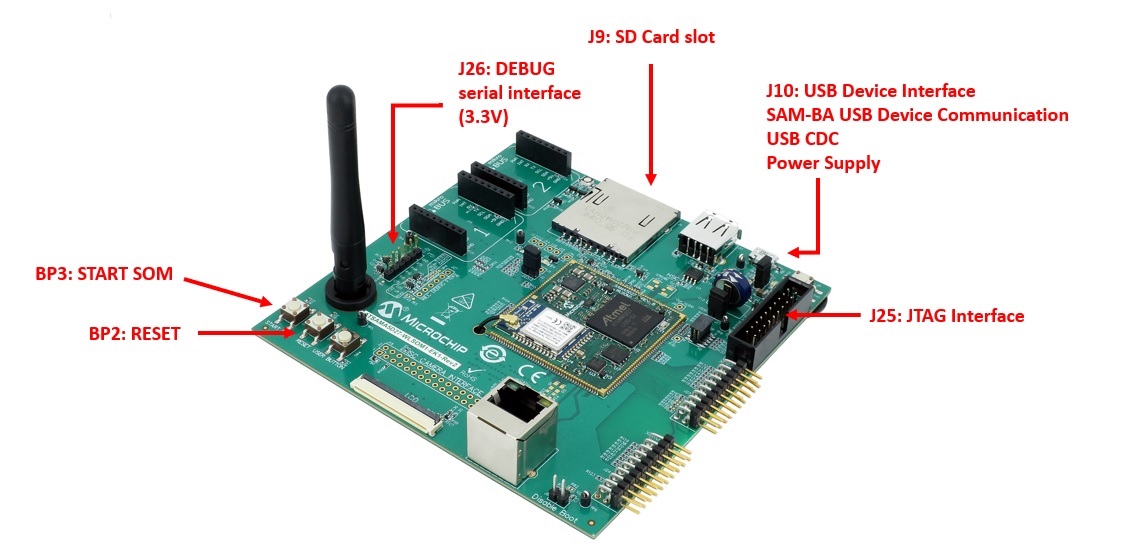
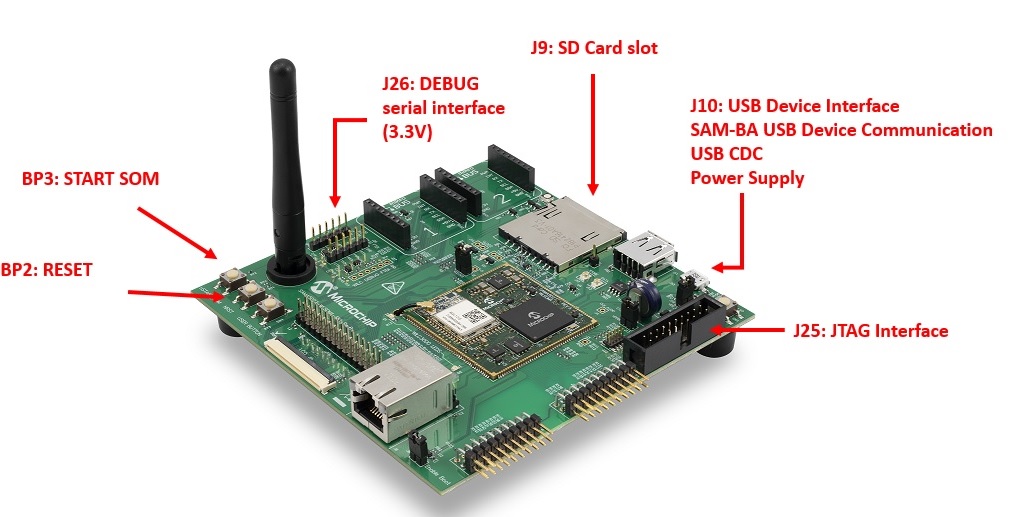
Access the console - sama5d27_wlsom1_ek
The ATSAMA5D27-WLSOM1-EK1 is ideal for evaluating and prototyping with the SAMA5D27-WLSOM1, Wireless System On Module (SOM) and the SAMA5D27C-LD2G, LPDDR2 System In Package (SIP).
The Evaluation Kit is made up of a baseboard, an ATSAMA5D27-WLSOM1 SOM soldered on the baseboard and an ATSAMA5D27C-LD2G SIP soldered on the SOM.
The ATSAMA5D27-WLSOM1 Module integrates a 2-Gbit LPDDR2SDRAM, a Wi-Fi®/Bluetooth® module, a Secure Element device, a Power Management IC (PMIC), a QSPI memory, a 10/100 Mbps Ethernet PHY. 94 GPIO pins are provided by the SOM for general use in the system.
The baseboard features a wide range of peripherals, as well as a user interface. Connectors and expansion headers allows for easy customization and quick access to leading edge embedded features such as MikroElektronica Click Boards.
The Evaluation Kit is supported by mainline Linux distribution as well as bare metal software frameworks allowing you to easily get started with your development.
The SAMA5D27 WLSOM1 EK documents can be found on microchip website, as following:
Kit Overview
Kit User Guide
The serial console can be accessed from the DEBUG port with the help of a TTL-to-USB serial cable (marked as DEBUG J26).
Using DEBUG on TTL-to-USB connector (DEBUG J26)
- For Microsoft Windows users: Install the driver of your USB TTL serial cable. FTDI-based ones are the most popular, have a look to this page to get the driver: http://www.ftdichip.com/Drivers/VCP.htm * Be sure to connect a 3.3V compatible cable and identify its GND pin. Place it properly according to the silkscreen and connect the cable to the board (J26)
- For Microsoft Windows users: Identify the USB connection that is established,
USB Serial Port should appear in Device Manager. The COMxx number will be used to configure the terminal emulator.
- For Linux users: Identify the serial USB connection by monitoring the last lines of
dmesg command. The /dev/ttyUSBx number will be used to configure the terminal emulator.
[605576.562740] usb 1-1.1.2: new full-speed USB device number 17 using ehci-pci
[605576.660920] usb 1-1.1.2: New USB device found, idVendor=0403, idProduct=6001
[605576.660933] usb 1-1.1.2: New USB device strings: Mfr=1, Product=2, SerialNumber=3
[605576.660939] usb 1-1.1.2: Product: TTL232R-3V3
[605576.660944] usb 1-1.1.2: Manufacturer: FTDI
[605576.660958] usb 1-1.1.2: SerialNumber: FTGNVZ04
[605576.663092] ftdi_sio 1-1.1.2:1.0: FTDI USB Serial Device converter detected
[605576.663120] usb 1-1.1.2: Detected FT232RL
[605576.663122] usb 1-1.1.2: Number of endpoints 2
[605576.663124] usb 1-1.1.2: Endpoint 1 MaxPacketSize 64
[605576.663126] usb 1-1.1.2: Endpoint 2 MaxPacketSize 64
[605576.663128] usb 1-1.1.2: Setting MaxPacketSize 64
[605576.663483] usb 1-1.1.2: FTDI USB Serial Device converter now attached to ttyUSB0
A /dev/ttyUSB0 node has been created.
- Now open your favorite terminal emulator with appropriate settings
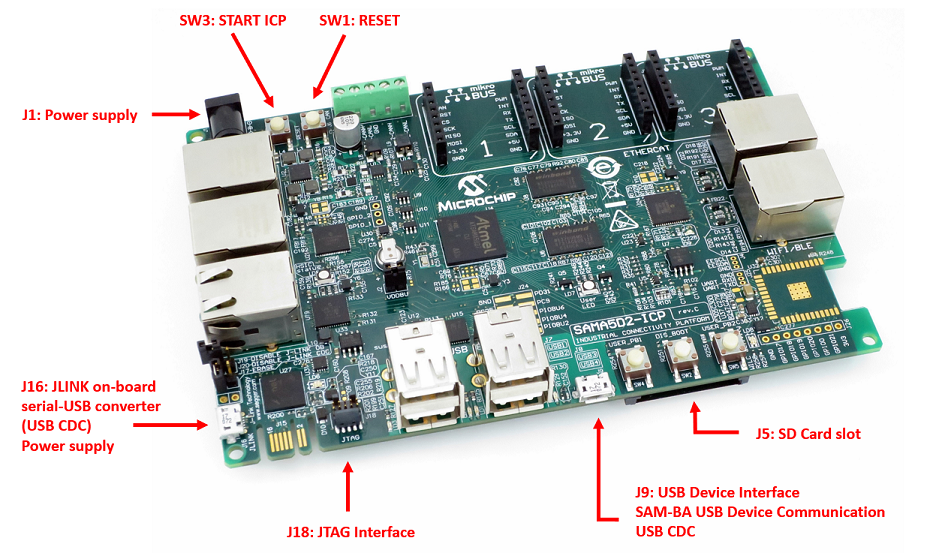
Access the console - sama5d2_icp
The SAMA5D2 Industrial Connectivity Platform (SAMA5D2-ICP) provides a versatile Total System Solutions platform that highlights Microchips MPU and connectivity ICs for industrial networking applications. The board features three mikroBUS click interface headers to support over 450 MikroElektronika Click boards and provisions to solder a Microchip ATWILC3000-MR110CA or a ATWILC3000-MR110UA WiFi/BT module
The baseboard features a wide range of peripherals, as well as a user interface. Connectors and expansion headers allows for easy customization and quick access to leading edge embedded features such as MikroElektronica Click Boards.
The Kit is supported by mainline Linux distribution as well as bare metal software frameworks allowing you to easily get started with your development.
The serial console can be accessed from the micro-A USB connector that gives access to the
on-board serial-to-USB converter (marked as J10 JLINK). In fact, the ATSAM3U chip on the Evaluation Kit acts as a serial-to-USB converter and is loaded with a firmware that is able to talk USB-CDC protocol.
- For Microsoft Windows users: Install the J-Link CDC USB driver. No need to install a driver on any regular Linux distribution.
- Connect the USB cable to the board (J16 JLINK)
- For Microsoft Windows users: identify the USB connection that is established
JLINK CDC UART Port should appear in Device Manager. The COMxx number will be used to configure the terminal emulator.
- For Linux users: identify the USB connection by monitoring the last lines of
dmesg command. The /dev/ttyACMx number will be used to configure the terminal emulator:
usb 1-1.2.2.4: new high-speed USB device number 33 using ehci-pci
usb 1-1.2.2.4: config 1 interface 1 altsetting 0 bulk endpoint 0x83 has invalid maxpacket 64
usb 1-1.2.2.4: config 1 interface 1 altsetting 0 bulk endpoint 0x4 has invalid maxpacket 64
usb 1-1.2.2.4: New USB device found, idVendor=1366, idProduct=0105
usb 1-1.2.2.4: New USB device strings: Mfr=1, Product=2, SerialNumber=3
usb 1-1.2.2.4: Product: J-Link
usb 1-1.2.2.4: Manufacturer: SEGGER
usb 1-1.2.2.4: SerialNumber: 000483029109
cdc_acm 1-1.2.2.4:1.0: ttyACM0: USB ACM device
- Now open your favorite terminal emulator with appropriate settings
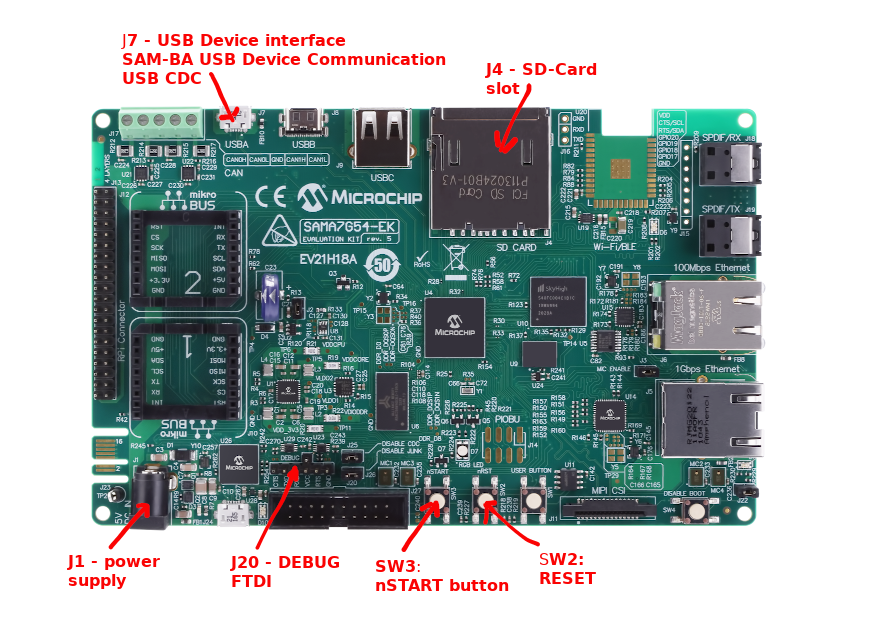
Access the console - sama7g5_ek
The SAMA7G5 Evaluation Kit (SAMA7G5-EK) provides a versatile Total System Solution platform that highlights Microchip MPU and connectivity ICs.
The board features on-board memories, two Ethernet interfaces, three USB ports, two CAN interfaces, one SD card connector, two mikroBUS click interface headers to support over 450 MikroElektronika Click boards, an RPi CSIcamera to support a camera module, an RPi extension connector to support several extension boards, and provision to solder a Microchip ATWILC3000-MR110xA Wi-Fi/Bluetooth module.
Note: RPi stands for Raspberry Pi. Raspberry Pi is a trademark of Raspberry Pi Trading.
The Kit is supported by mainline Linux distribution as well as bare metal software frameworks allowing you to easily get started with your development.
Kit Overview
Kit User Guide
The serial console can be accessed from the DEBUG port with the help of a TTL-to-USB serial cable (marked as DEBUG J20).
Using DEBUG on TTL-to-USB connector (DEBUG J20)
- For Microsoft Windows users: Install the driver of your USB TTL serial cable. FTDI-based ones are the most popular, have a look to this page to get the driver: http://www.ftdichip.com/Drivers/VCP.htm * Be sure to connect a 3.3V compatible cable and identify its GND pin. Place it properly according to the silkscreen and connect the cable to the board (J20)
- For Microsoft Windows users: identify the USB connection that is established
JLINK CDC UART Port should appear in Device Manager. The COMxx number will be used to configure the terminal emulator.
- For Linux users: Identify the serial USB connection by monitoring the last lines of
dmesg command. The /dev/ttyUSBx number will be used to configure the terminal emulator.
[605576.562740] usb 1-1.1.2: new full-speed USB device number 17 using ehci-pci
[605576.660920] usb 1-1.1.2: New USB device found, idVendor=0403, idProduct=6001
[605576.660933] usb 1-1.1.2: New USB device strings: Mfr=1, Product=2, SerialNumber=3
[605576.660939] usb 1-1.1.2: Product: TTL232R-3V3
[605576.660944] usb 1-1.1.2: Manufacturer: FTDI
[605576.660958] usb 1-1.1.2: SerialNumber: FTGNVZ04
[605576.663092] ftdi_sio 1-1.1.2:1.0: FTDI USB Serial Device converter detected
[605576.663120] usb 1-1.1.2: Detected FT232RL
[605576.663122] usb 1-1.1.2: Number of endpoints 2
[605576.663124] usb 1-1.1.2: Endpoint 1 MaxPacketSize 64
[605576.663126] usb 1-1.1.2: Endpoint 2 MaxPacketSize 64
[605576.663128] usb 1-1.1.2: Setting MaxPacketSize 64
[605576.663483] usb 1-1.1.2: FTDI USB Serial Device converter now attached to ttyUSB0
A /dev/ttyUSB0 node has been created.
- Now open your favorite terminal emulator with appropriate settings
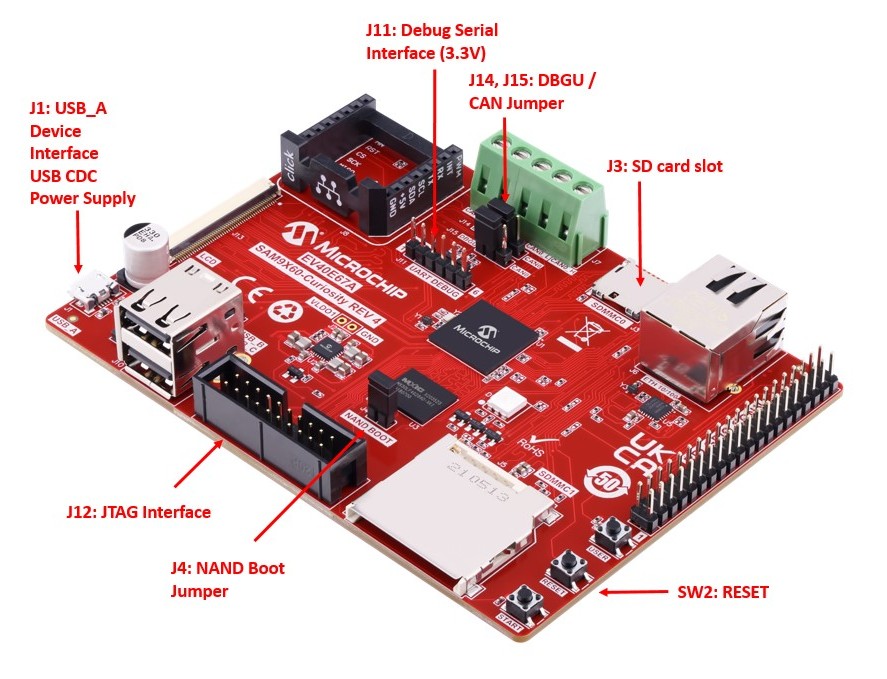
Access the console - sam9x60_curiosity
The SAM9X60-Curiosity documents can be found on microchip website, as following:
Kit Overview
Kit User Guide
The serial console can be accessed from two connectors. One is from the DEBUG port with the help of a TTL-to-USB serial cable (marked as DEBUG J11), another is from micro-A USB connector that gives access to the
on-board serial-to-USB converter (marked as J1 USB_A).
Using DEBUG on TTL-to-USB connector (DEBUG J11)
- For Microsoft Windows users: Install the driver of your USB TTL serial cable. FTDI-based ones are the most popular, have a look to this page to get the driver: http://www.ftdichip.com/Drivers/VCP.htm
- Be sure to connect a 3.3V compatible cable and identify its GND pin. Place it properly according to the silkscreen and connect the cable to the board (J11)
- Make sure the jumpers J14 and J15 are closed on the side marked as DBGU for the UART to work as Debug console.
- For Microsoft Windows users: Identify the USB connection that is established,
USB Serial Port should appear in Device Manager. The COMxx number will be used to configure the terminal emulator.
- For Linux users: Identify the serial USB connection by monitoring the last lines of
dmesg command. The /dev/ttyUSBx number will be used to configure the terminal emulator.
[605576.562740] usb 1-1.1.2: new full-speed USB device number 17 using ehci-pci
[605576.660920] usb 1-1.1.2: New USB device found, idVendor=0403, idProduct=6001
[605576.660933] usb 1-1.1.2: New USB device strings: Mfr=1, Product=2, SerialNumber=3
[605576.660939] usb 1-1.1.2: Product: TTL232R-3V3
[605576.660944] usb 1-1.1.2: Manufacturer: FTDI
[605576.660958] usb 1-1.1.2: SerialNumber: FTGNVZ04
[605576.663092] ftdi_sio 1-1.1.2:1.0: FTDI USB Serial Device converter detected
[605576.663120] usb 1-1.1.2: Detected FT232RL
[605576.663122] usb 1-1.1.2: Number of endpoints 2
[605576.663124] usb 1-1.1.2: Endpoint 1 MaxPacketSize 64
[605576.663126] usb 1-1.1.2: Endpoint 2 MaxPacketSize 64
[605576.663128] usb 1-1.1.2: Setting MaxPacketSize 64
[605576.663483] usb 1-1.1.2: FTDI USB Serial Device converter now attached to ttyUSB0
A /dev/ttyUSB0 node has been created.
- Now open your favorite terminal emulator with appropriate settings
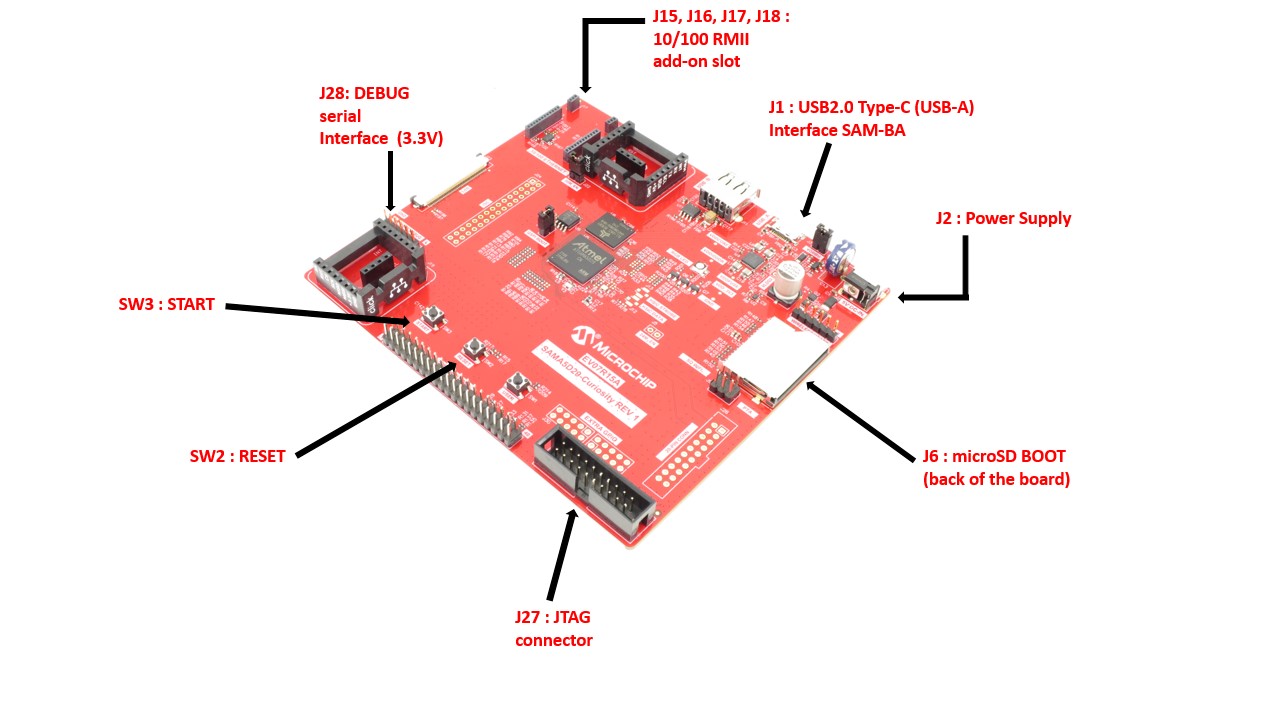
Access the console - sama5d29_curiosity
The SAMA5D29-Curiosity follows the Microchip MPU strategy for low-cost evaluation kits, showcasing all the features that the SAMA5D29 MPU offers.
The SAMA5D29-Curiosity board integrates a 4-Gbit LPDDR2SDRAM, one LCD RGB666 interface, one ISC Camera header, one USB Type-C connector, one USB Type-A connector, one μSD card interface, one SD Card / Radio Module interface, a Power Management IC (PMIC), a 64 Mb QSPI memory and
one 10/100 RMII add-on slot.
For expansion : Raspberry Pi 40-pin GPIO connector, two mikroBUS connectors (Hundreds of possible Click extensions featuring Microchip functions inside), one multipurpose 20-pin connector (Exposes NAND Flash interface) and two PIOBU/System headers.
The Kit is supported
Linux4Microchip Kernel LTS as well as mainline Linux Kernel.
The SAMA5D29-Curiosity documents can be found on microchip website, as following:
SoC Datasheet
Kit Overview
Kit User Guide
The serial console can be accessed from the DEBUG port with the help of a TTL-to-USB serial cable (marked as DEBUG J28).
Using DEBUG on TTL-to-USB connector (DEBUG J28)
- For Microsoft Windows users: Install the driver of your USB TTL serial cable. FTDI-based ones are the most popular, have a look to this page to get the driver: http://www.ftdichip.com/Drivers/VCP.htm * Be sure to connect a 3.3V compatible cable and identify its GND pin. Place it properly according to the silkscreen and connect the cable to the board (J28)
- For Microsoft Windows users: Identify the USB connection that is established,
USB Serial Port should appear in Device Manager. The COMxx number will be used to configure the terminal emulator.
- For Linux users: Identify the serial USB connection by monitoring the last lines of
dmesg command. The /dev/ttyUSBx number will be used to configure the terminal emulator.
[605576.562740] usb 1-1.1.2: new full-speed USB device number 17 using ehci-pci
[605576.660920] usb 1-1.1.2: New USB device found, idVendor=0403, idProduct=6001
[605576.660933] usb 1-1.1.2: New USB device strings: Mfr=1, Product=2, SerialNumber=3
[605576.660939] usb 1-1.1.2: Product: TTL232R-3V3
[605576.660944] usb 1-1.1.2: Manufacturer: FTDI
[605576.660958] usb 1-1.1.2: SerialNumber: FTGNVZ04
[605576.663092] ftdi_sio 1-1.1.2:1.0: FTDI USB Serial Device converter detected
[605576.663120] usb 1-1.1.2: Detected FT232RL
[605576.663122] usb 1-1.1.2: Number of endpoints 2
[605576.663124] usb 1-1.1.2: Endpoint 1 MaxPacketSize 64
[605576.663126] usb 1-1.1.2: Endpoint 2 MaxPacketSize 64
[605576.663128] usb 1-1.1.2: Setting MaxPacketSize 64
[605576.663483] usb 1-1.1.2: FTDI USB Serial Device converter now attached to ttyUSB0
A /dev/ttyUSB0 node has been created.
- Now open your favorite terminal emulator with appropriate settings
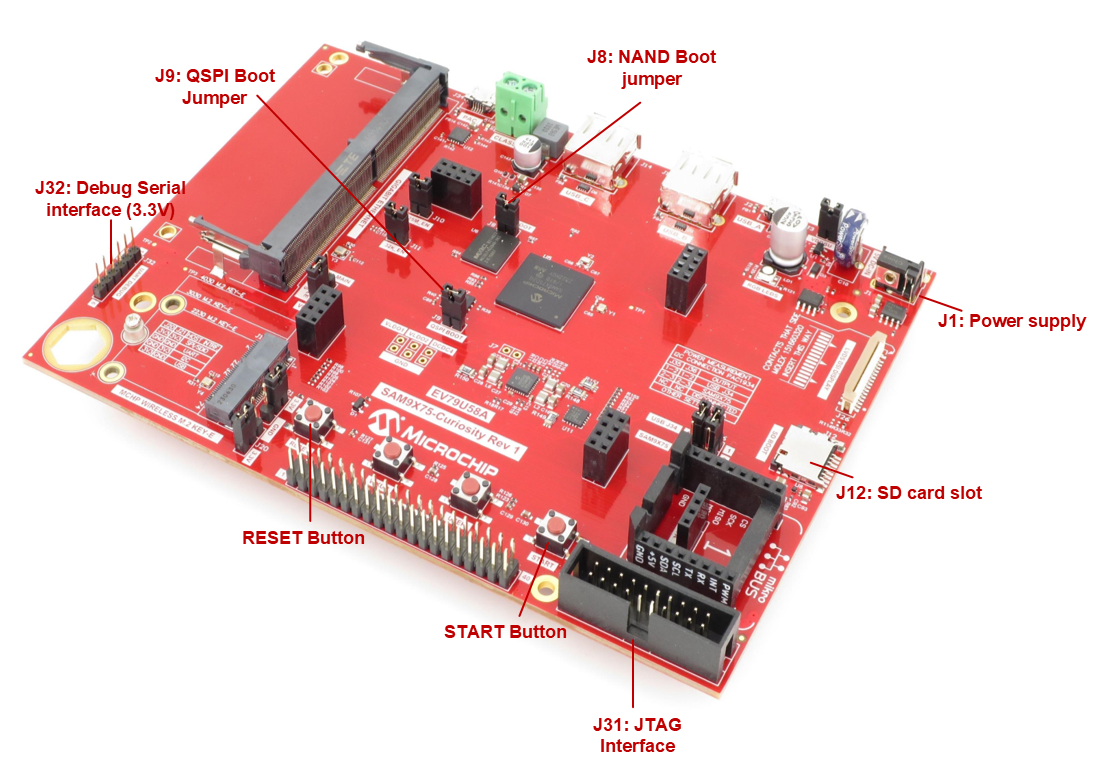
Access the console - sam9x75_curiosity
The SAM9X75-Curiosity documents can be found on microchip website, as following:
Kit Overview
Kit User Guide
The serial console can be accessed from two connectors. One is from the DEBUG port with the help of a TTL-to-USB serial cable (marked as DEBUG J11), another is from micro-A USB connector that gives access to the
on-board serial-to-USB converter (marked as J1 USB_A).
Using DEBUG on TTL-to-USB connector (DEBUG J11)
- For Microsoft Windows users: Install the driver of your USB TTL serial cable. FTDI-based ones are the most popular, have a look to this page to get the driver: http://www.ftdichip.com/Drivers/VCP.htm
- Be sure to connect a 3.3V compatible cable and identify its GND pin. Place it properly according to the silkscreen and connect the cable to the board (J11)
- Make sure the jumpers J14 and J15 are closed on the side marked as DBGU for the UART to work as Debug console.
- For Microsoft Windows users: Identify the USB connection that is established,
USB Serial Port should appear in Device Manager. The COMxx number will be used to configure the terminal emulator.
- For Linux users: Identify the serial USB connection by monitoring the last lines of
dmesg command. The /dev/ttyUSBx number will be used to configure the terminal emulator.
[605576.562740] usb 1-1.1.2: new full-speed USB device number 17 using ehci-pci
[605576.660920] usb 1-1.1.2: New USB device found, idVendor=0403, idProduct=6001
[605576.660933] usb 1-1.1.2: New USB device strings: Mfr=1, Product=2, SerialNumber=3
[605576.660939] usb 1-1.1.2: Product: TTL232R-3V3
[605576.660944] usb 1-1.1.2: Manufacturer: FTDI
[605576.660958] usb 1-1.1.2: SerialNumber: FTGNVZ04
[605576.663092] ftdi_sio 1-1.1.2:1.0: FTDI USB Serial Device converter detected
[605576.663120] usb 1-1.1.2: Detected FT232RL
[605576.663122] usb 1-1.1.2: Number of endpoints 2
[605576.663124] usb 1-1.1.2: Endpoint 1 MaxPacketSize 64
[605576.663126] usb 1-1.1.2: Endpoint 2 MaxPacketSize 64
[605576.663128] usb 1-1.1.2: Setting MaxPacketSize 64
[605576.663483] usb 1-1.1.2: FTDI USB Serial Device converter now attached to ttyUSB0
A /dev/ttyUSB0 node has been created.
- Now open your favorite terminal emulator with appropriate settings


